A tour of the side panel: what every button does, and how to fill in a note or copy one forward in a few clicks.
Works on unsigned SOAP notesGoogle ChromeNew here? Install it first
Before you start
FastForward lives in a panel along the right-hand side of Chrome. Click the FastForward arrows icon in your toolbar to open it.
It does two jobs on the note you have open in Practice Fusion:
Set encounter fills in a note from one of your encounter types — its quality-of-care answers, diagnoses, care plan and SOAP templates — and saves it.
Copy Previous Encounter brings the sections you choose forward from one of the patient's earlier SOAP notes.
Both work only on a new or unsigned SOAP note. On anything else — a signed note, another type of note, or a page that isn't a chart — FastForward refuses and says so, rather than write where it shouldn't.
Your patient notes stay in your browser. Your encounter types are saved to our server so they follow you between computers. The contents of your notes are not.
The pictures in this guide use made-up encounter types. The numbered yellow badges were added for this guide; you won't see them in the panel.
Signing in
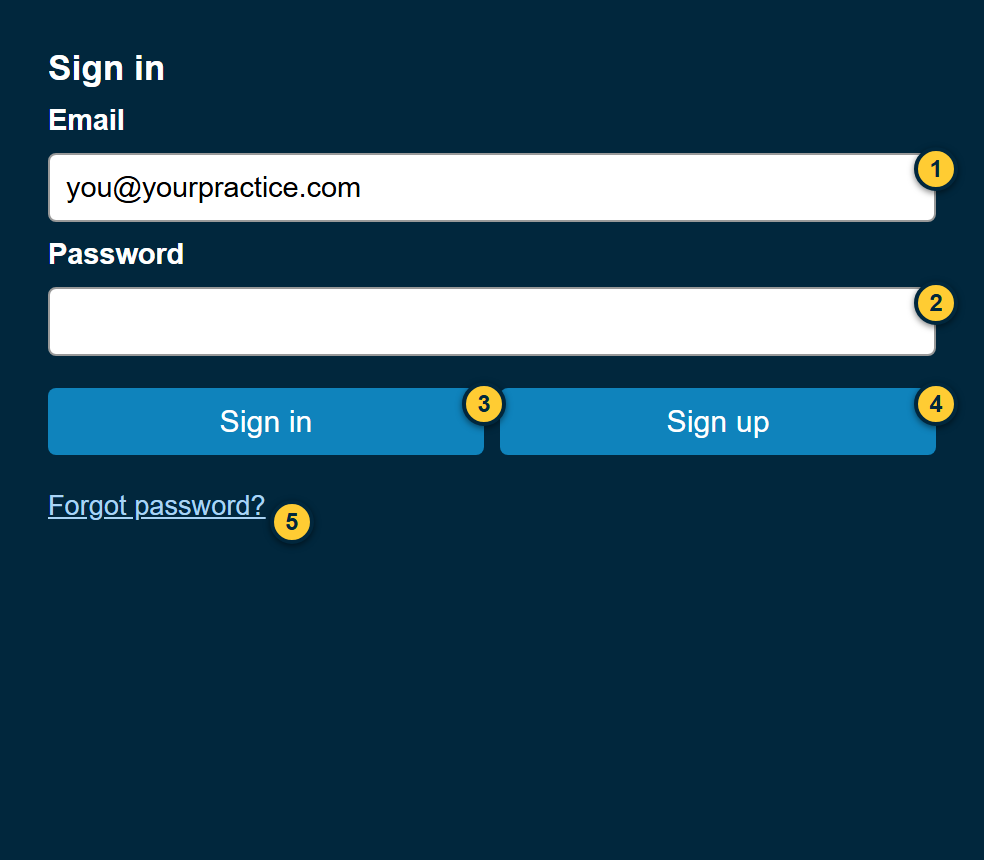
Email — the address you subscribed with.
Password — the FastForward password you set after subscribing. This is not your Practice Fusion password.
Sign in — or press Enter in the password box. Your encounter types load straight away.
Sign up — opens our website so you can subscribe.
Forgot password? — opens a page where we email you a link to set a new one.
You stay signed in until you sign out, or until you sign in on another computer: an account works on one computer at a time.
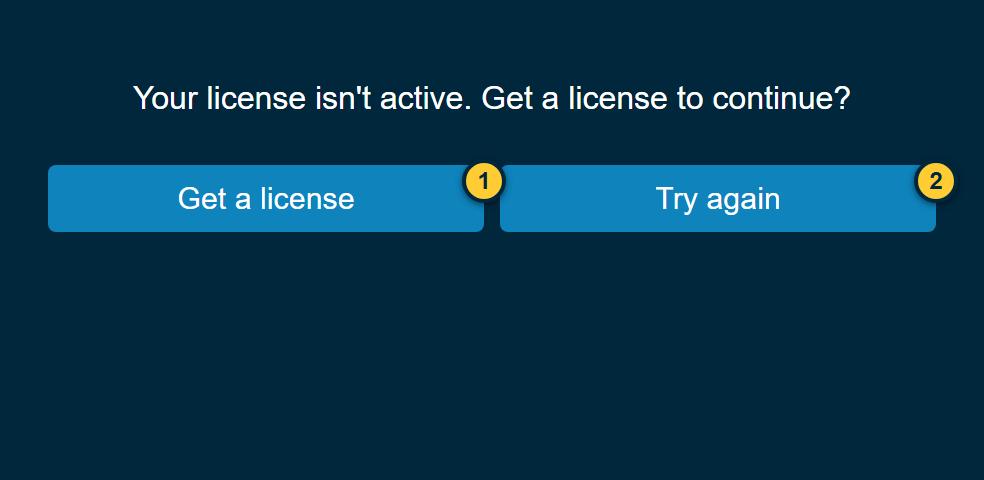
If your license isn't active
Get a license — opens our website to subscribe or renew.
Try again — back to the sign-in panel.
The same panel appears, saying Login failed. Need an account?, when an email and password aren't recognised.
The main panel
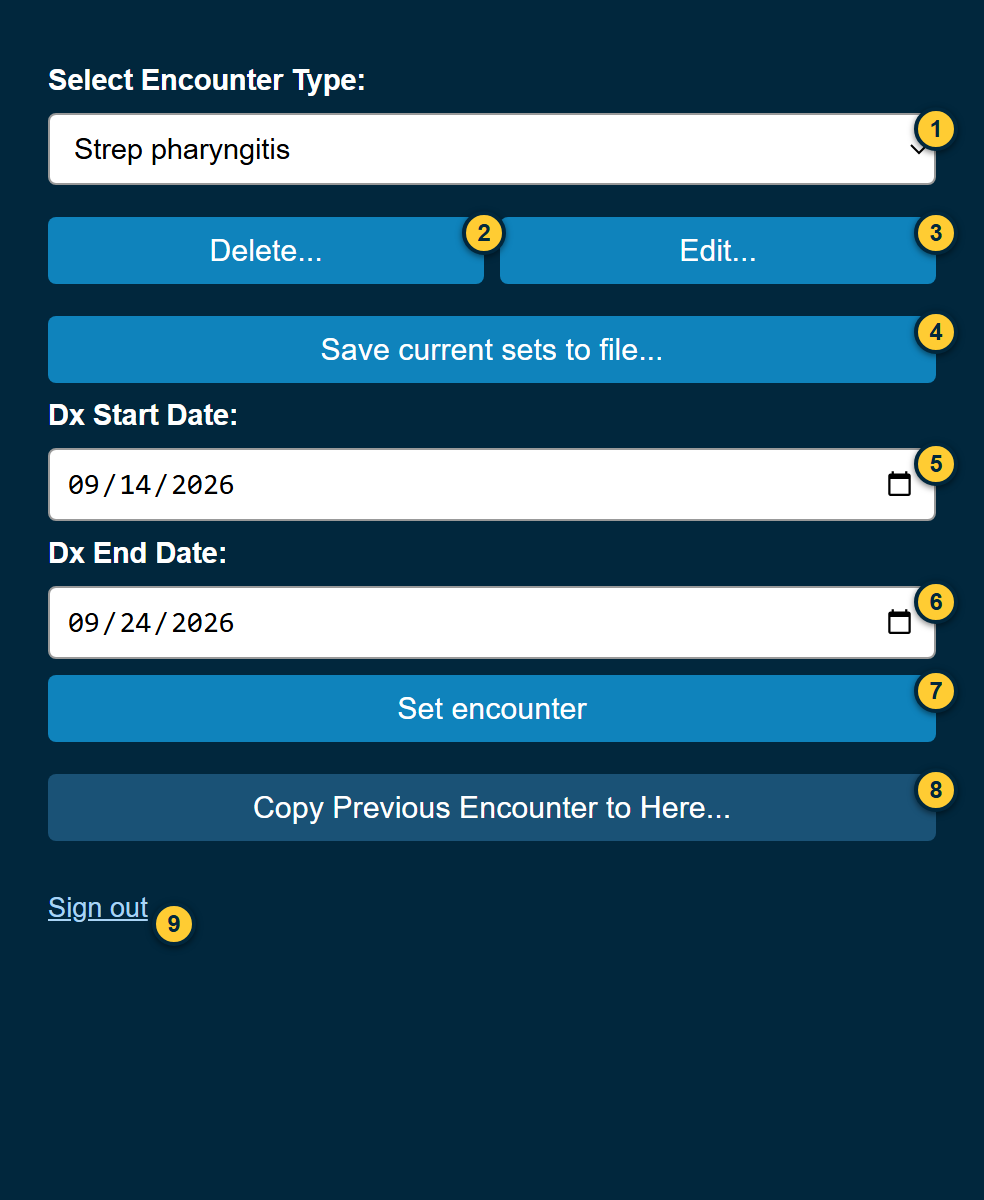
Select Encounter Type — the encounter type Set encounter will use. FastForward remembers your choice.
Delete... — deletes the selected encounter type, after asking you to confirm. See Deleting and backing up.
Save current sets to file... — saves a copy of all your encounter types to a file on your computer.
Dx Start Date — the start date given to every diagnosis FastForward enters. It's filled in from the note's date of service when FastForward can read it, otherwise the date you last chose, otherwise today.
Dx End Date — when acute diagnoses end: the start date plus the encounter type's Dx duration. Chronic diagnoses have no end date. It's worked out for you; to change it, change the start date or the encounter type's Dx duration.
Set encounter — fills in the open note from the selected encounter type. See Setting an encounter.
Copy Previous Encounter to Here... — copies sections from one of this patient's earlier SOAP notes into the open note. See Copying a previous encounter.
Sign out — signs you out of FastForward on this computer.
Setting an encounter
In Practice Fusion, open the patient's chart and the new or unsigned SOAP note you want to fill in.
Open the FastForward panel and choose the Encounter Type.
Check the Dx Start Date.
Click Set encounter.
FastForward then works through the note in this order, and you can watch it happen:
The three quality-of-care questions are answered, and the seven quality-of-care boxes ticked or cleared, to match the encounter type.
Each diagnosis is added as Acute or Chronic, following the encounter type's Acuity. An acute diagnosis runs from the Dx Start Date for the encounter type's Dx duration; a chronic one gets the start date and no stop date.
The care plan section is replaced with the encounter type's care plan.
Each SOAP section's template is found by name and inserted.
The note is saved.
When it finishes, Practice Fusion shows Encounter set! You may proceed with editing. and the panel closes.
If a step didn't complete, the message is headed Encounter Set (with problems) and lists what didn't. Check those parts of the note before you sign it.
Leave the note alone until the message appears. FastForward works by clicking through Practice Fusion the way you would, and a click of yours part-way through can send it somewhere unexpected.
A Configuration Warning means a diagnosis code or a template name in that encounter type couldn't be used. Open the encounter type with Edit... and check its codes and template names.
Copying a previous encounter
Use this when the patient is back for the same problem and much of the last note still applies.
Open the new or unsigned SOAP note you want to copy into.
Set the Dx Start Date on the main panel — copied diagnoses start on it.
Click Copy Previous Encounter to Here...
FastForward saves your note, then reads the patient's Timeline. Your chart visibly flicks across to the Timeline and back — that's expected.
Choose the earlier encounter
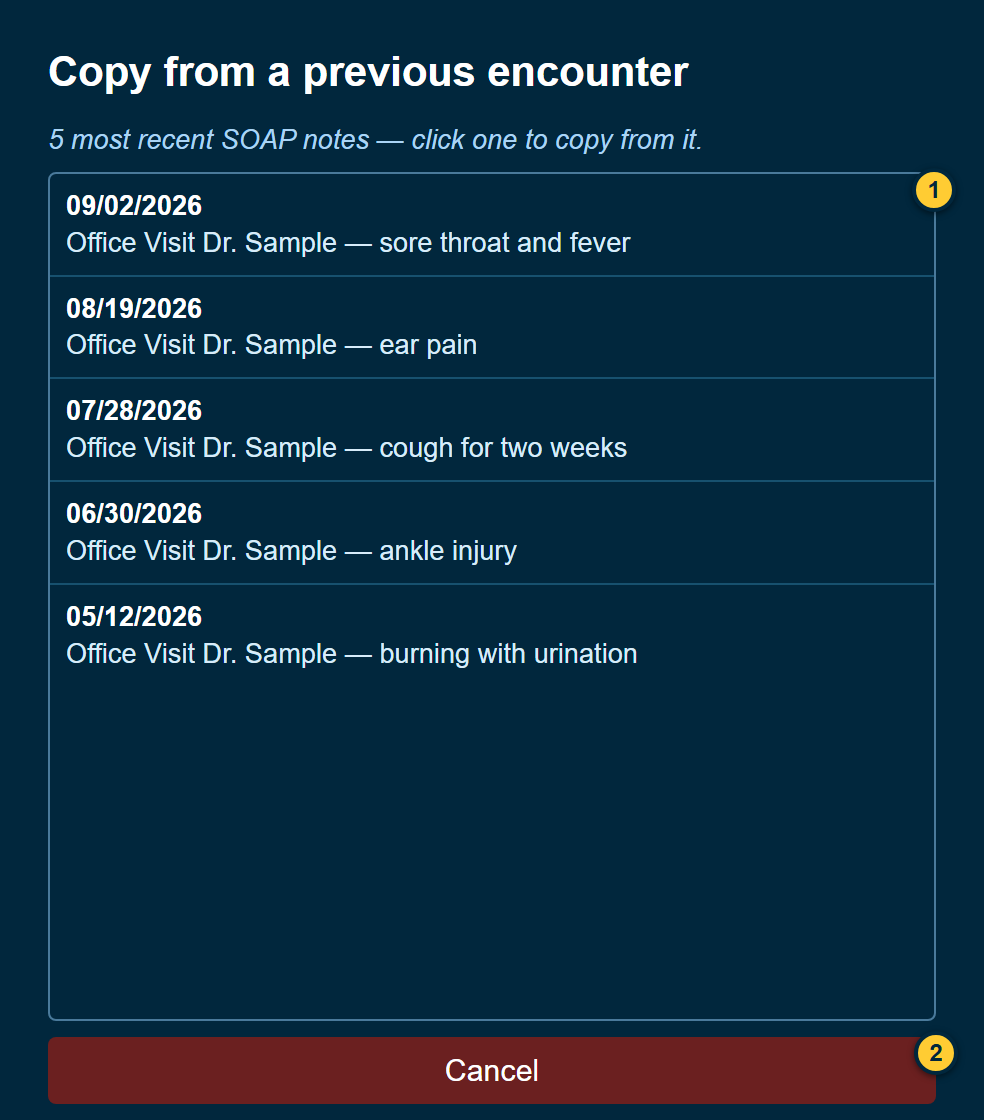
The patient's recent SOAP notes — newest first, up to ten, each with its date, visit type and provider, and chief complaint. The note you're on isn't listed. Click one to choose it.
Cancel — back to the main panel. Escape does the same.
Choose what to copy
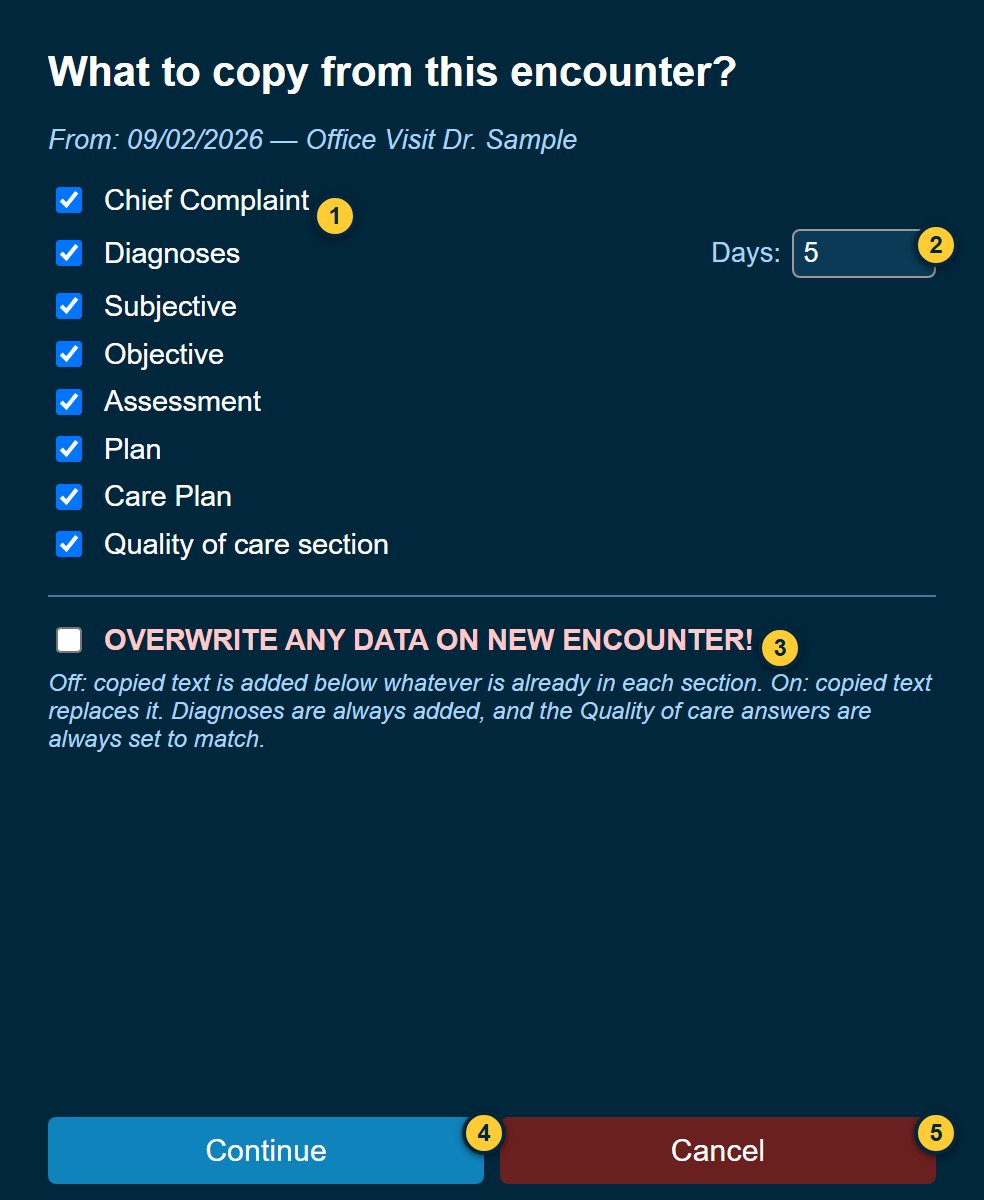
The sections — Chief Complaint, Subjective, Objective, Assessment, Plan, Care Plan, and the Quality of care section. All are ticked to start with; untick any you don't want.
Diagnoses and Days — copies the earlier note's diagnoses, each keeping its acuity and starting on the Dx Start Date. Acute ones run for this many days; chronic ones get no stop date. Codes already on the new note are left alone rather than entered twice. FastForward remembers the number of days. Untick Diagnoses and Days greys out.
OVERWRITE ANY DATA ON NEW ENCOUNTER! — off, as it starts, copied text is added below whatever each section already holds. On, it replaces it. Diagnoses are always added, and the quality-of-care answers are always set to match, whichever you choose.
Continue — copies the chosen sections. The chart detours to the earlier note and back, the copy is written in, and the note is saved. Practice Fusion then shows Encounter Copied, listing what was copied and what was skipped.
Cancel — back to the list of earlier encounters. Escape does the same.
Turn on OVERWRITE only when you mean it. Anything already typed in the copied sections of the new note is replaced.
Editing encounter types
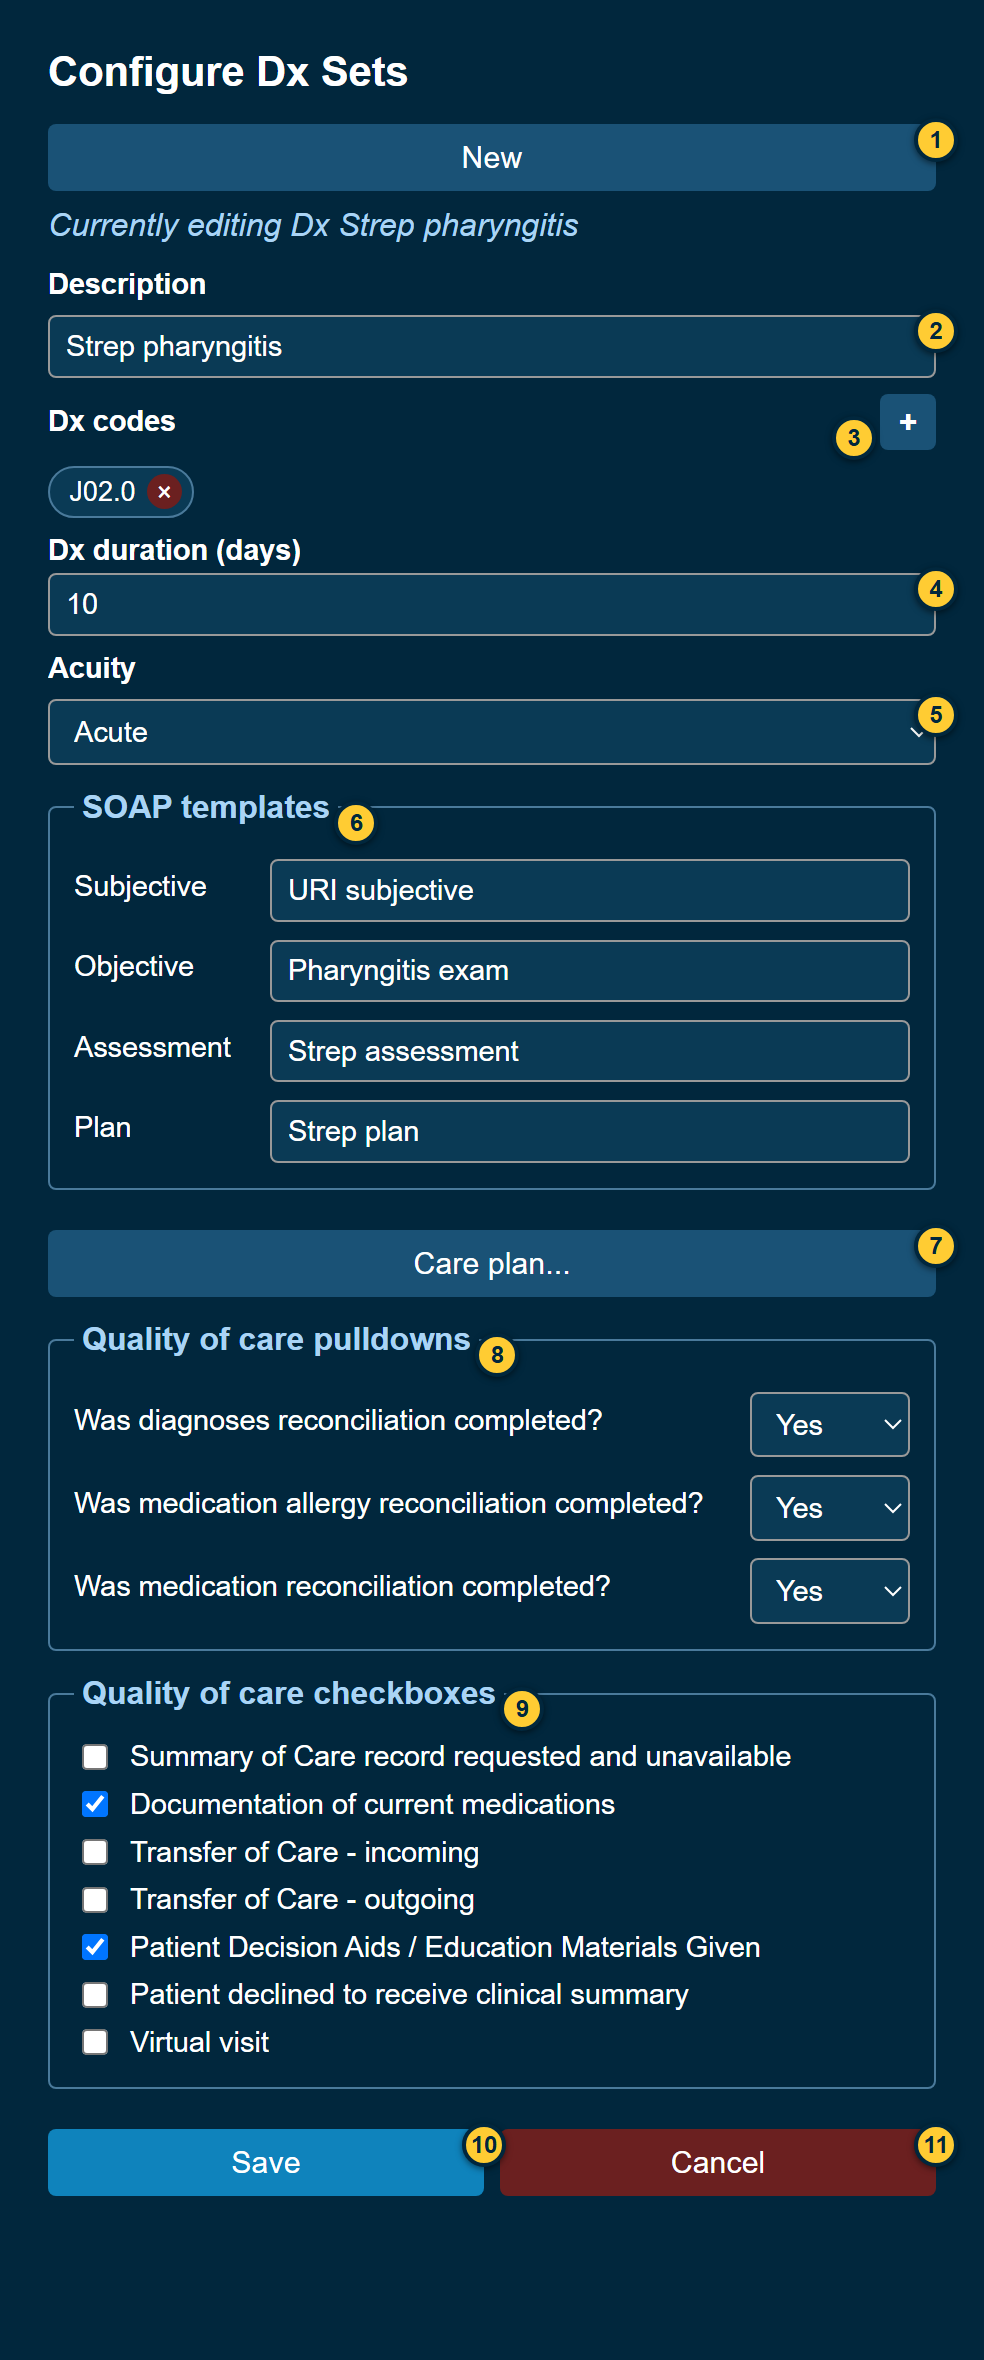
An encounter type is a saved recipe for one kind of visit: its diagnoses, SOAP templates, care plan and quality-of-care answers. Click Edit... on the main panel to open the one selected there.
New — clears the form to create a new encounter type. The line beneath changes from Currently editing Dx … to Creating new Dx set.
Description — the name shown in the encounter type list.
Dx codes — the diagnosis codes this type enters. Point at a code to see its description; click × to remove it. Click + to search for codes to add. See Searching for Dx codes.
Dx duration (days) — how long each acute diagnosis runs from the Dx Start Date. Chronic diagnoses have no end date.
Acuity — Acute or Chronic: how each diagnosis this type enters is marked in Practice Fusion. Chronic diagnoses get a start date and no stop date.
SOAP templates — the name of your Practice Fusion template for the Subjective, Objective, Assessment and Plan sections. Type each exactly as it appears in Practice Fusion's template search. Leave a box empty to skip that section.
Care plan... — the text written into the note's care plan section. See Care plans.
Quality of care pulldowns — Yes, No or n/a for each of the three reconciliation questions.
Quality of care checkboxes — ticked here means ticked in the note; unticked here means cleared.
Save — saves the encounter type to your account, so it's there on any computer you sign in on.
Cancel — closes the editor without saving. Escape does the same.
Nothing you change here is kept until you click Save — including changes made in the Dx search and Care plan panels.
Searching for Dx codes
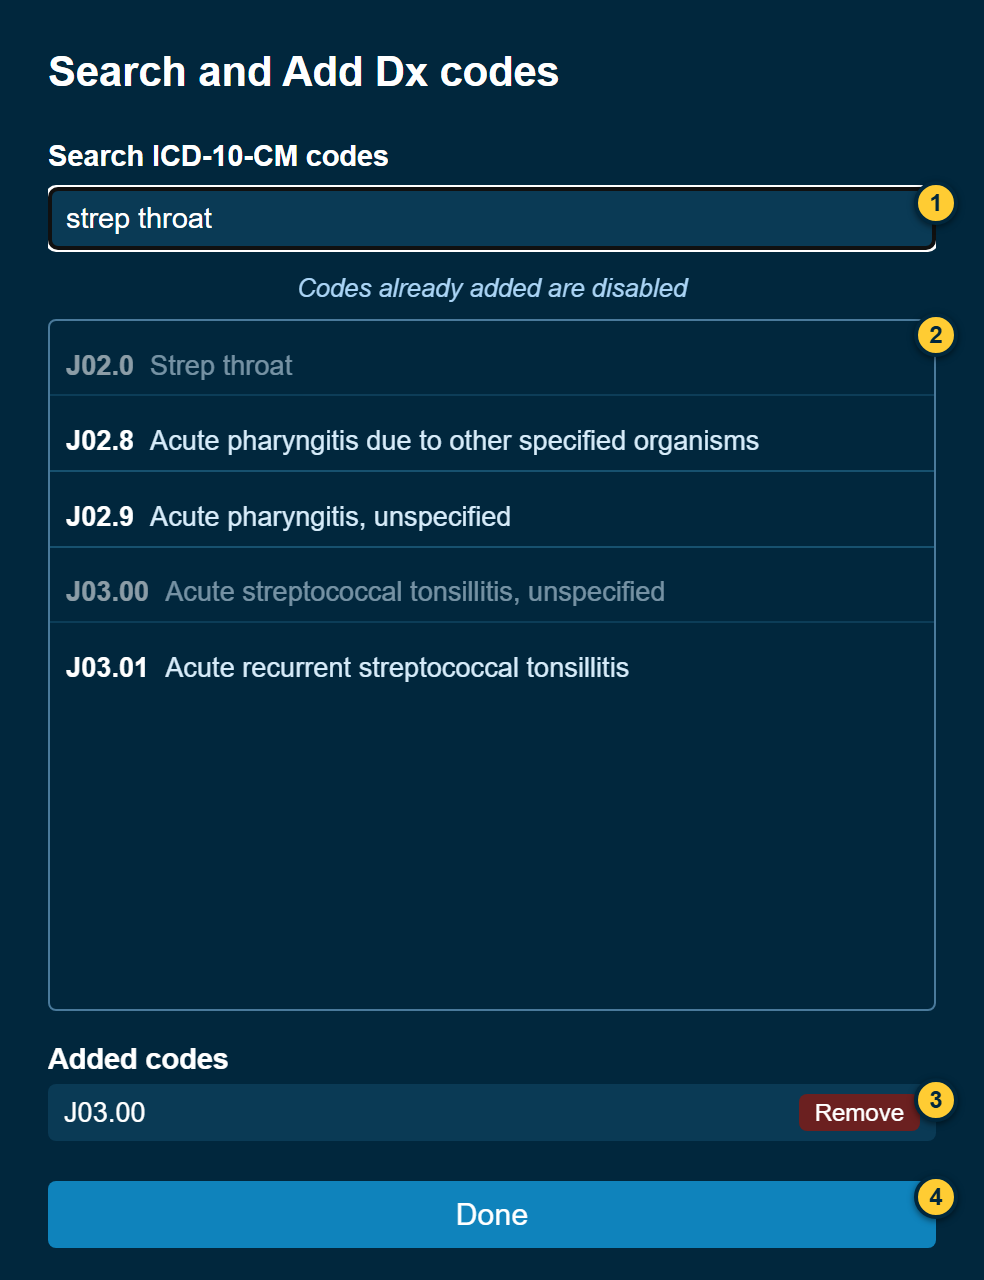
Search ICD-10-CM codes — type at least three characters: a code, a clinical term, or an everyday one such as “pink eye”. Add right, left or both to find side-specific codes.
Results — click a code to add it. Codes already on the encounter type, or already added, are greyed out.
Added codes — what you've added this time. Remove takes one back off.
Done — adds them to the encounter type and returns to the editor. Click Save there to keep them.
What you type here goes straight from your browser to a public code lookup run by the U.S. National Library of Medicine. It doesn't pass through us. Type condition names, never anything about a patient.
Care plans
Each encounter type can have its own care plan: the patient instructions written into the note's care plan section. A type without one uses our default plan, and keeps up with it when we update it. Click Care plan... in the editor.
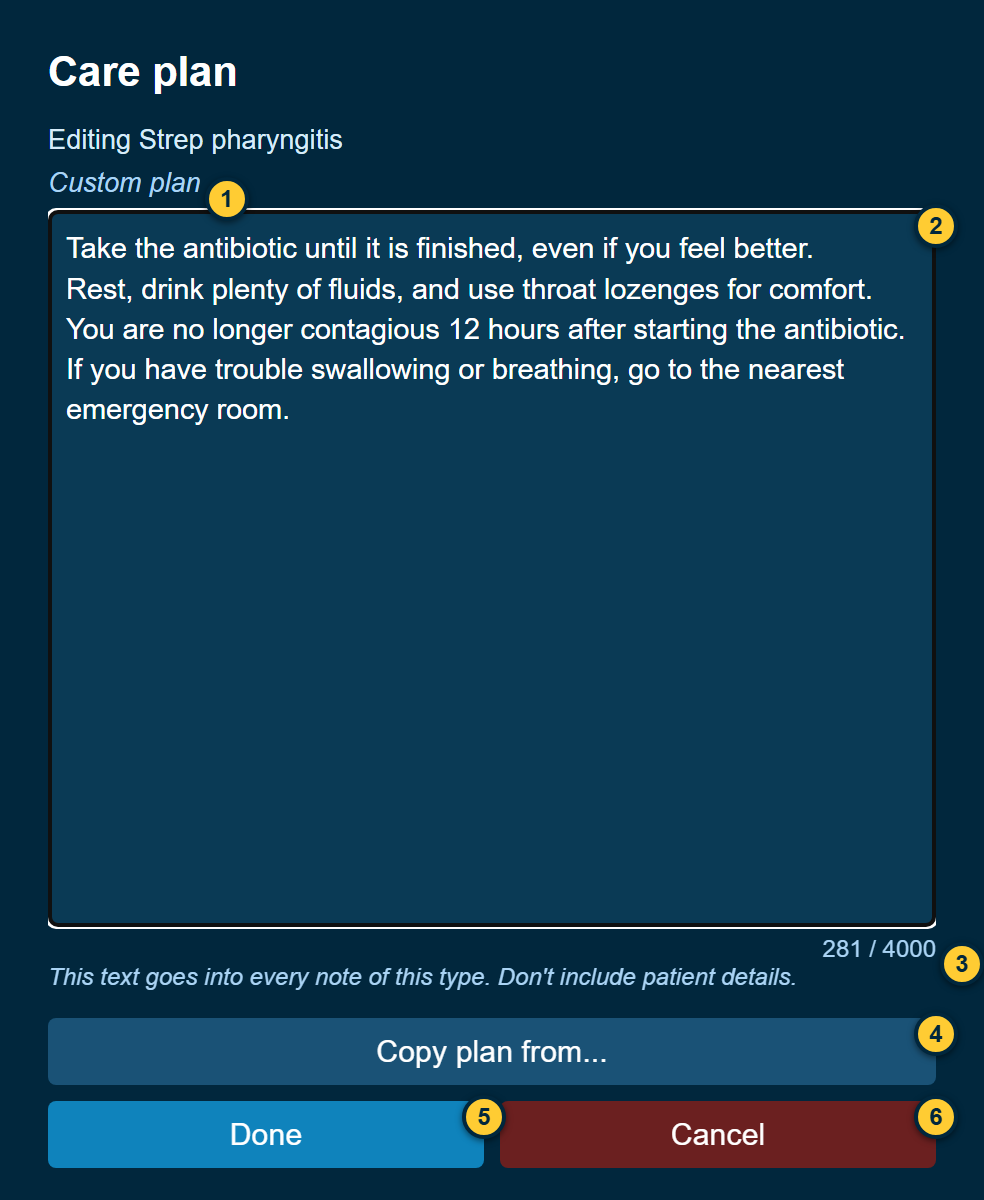
Custom plan or Using the default plan — whether this type has its own plan. It changes as you type.
The plan — line breaks are kept. Leave it empty, or make it the same as the default, to use the default plan.
Characters used, out of 4,000. Anything longer is cut to 4,000 and the panel says Care plan maximum length 4000 characters. Extra characters were lost.
Copy plan from... — start from another encounter type's plan, or go back to the default.
Done — keeps your changes and returns to the editor. Click Save there to keep them for good.
Cancel — discards the changes you made in this panel.
This text goes into every note of this type, so don't include patient details.
Copy plan from
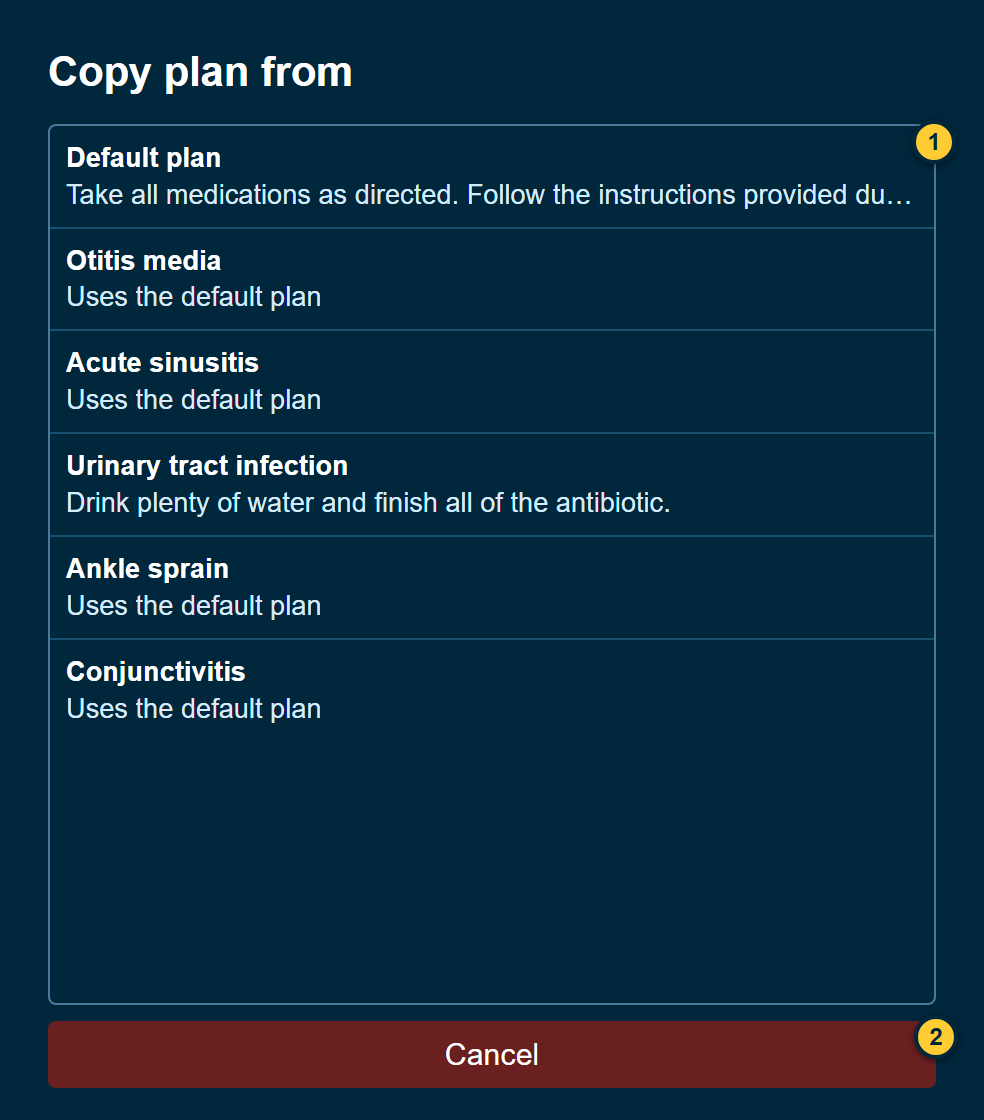
The list — Default plan comes first: choose it to go back to the default. Then every other encounter type, with the first line of its plan, or Uses the default plan. Clicking one replaces the text in the editor; nothing is kept until you click Done and then Save.
Cancel — back to the Care plan panel with your text unchanged.
Deleting and backing up
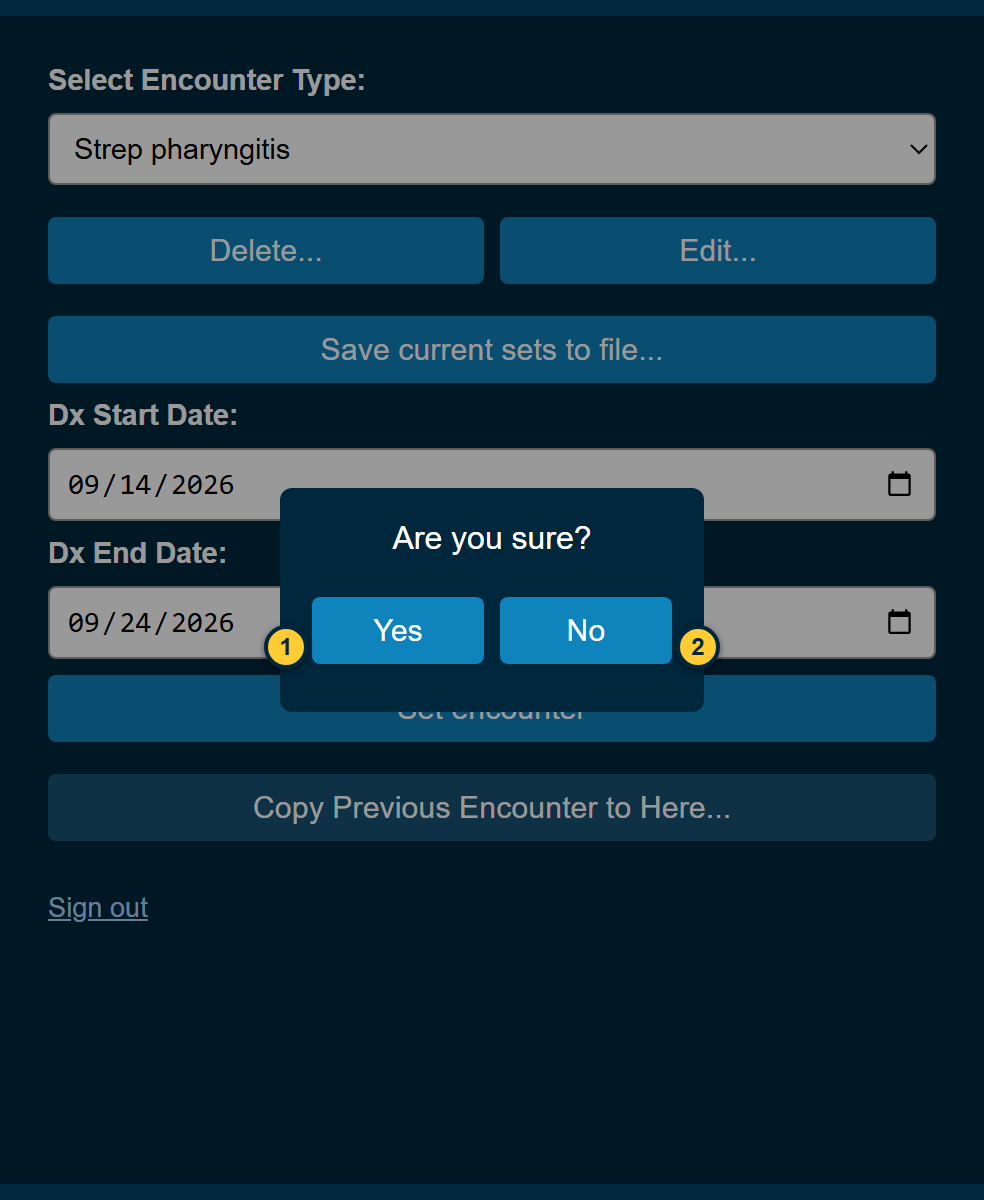
Clicking Delete... on the main panel asks before it deletes anything.
Yes — deletes the selected encounter type from your account, on every computer. This can't be undone.
No — keeps it.
Save current sets to file... on the main panel saves every encounter type to a file called diagnosisParams.json on your computer. It holds your encounter types only — no patient information. FastForward can't load that file back in by itself; if you ever need encounter types restored from it, send it to us.
When something goes wrong
“You must be on a new or unsigned SOAP note to use this feature”
Open the patient's chart, then an unsigned SOAP note, and try again. FastForward won't write to a signed note or to another type of note.
The encounter type list says “Loading encounters...” and never fills in
Close the panel and open it again. If it still doesn't fill in, reinstall using Installing FastForward. Your encounter types are stored with your account and come back when you sign in.
“Signed in on another device. Please sign in again.”
Your account works on one computer at a time, and signing in somewhere else signed you out here. Sign in again.
“Your license isn't active. Get a license to continue?”
Your subscription has ended or a payment didn't go through. Get a license renews it.
“Offline — connect to the internet to use the extension.” or “Connect to the internet to continue.”
FastForward checks your subscription with our server before each action. Reconnect and try again.
A template wasn't inserted
Check that its name in Edit... matches the template's name in Practice Fusion exactly.
“Couldn't identify this encounter from the page URL”
Open the note from the patient's chart, rather than from a link or a bookmark, and try Copy Previous Encounter again.
“Saved locally, but syncing to the server failed”
Your change is on this computer but hasn't reached your account. Check your connection and click Save again — otherwise it will be replaced the next time you sign in.